
Virtually Try On Glasses With Prescript AR

Virtual try-on for glasses has changed the game for online eyewear shopping. In a matter of seconds, you can align frames with your features and assemble a personalised package that fits both your style and prescription.
Benefits Of Virtual Try-On Glasses
A live fitting session slashes the uncertainty around how glasses will look and feel in different environments.
- Increased confidence when you preview styles from all angles
- Customised eyewear bundles tailored to your vision needs
- Break reminders to protect your eyes and ease screen fatigue
- Lower shipping overhead and fewer returns
Take Sarah, a marketing consultant in Sydney, for example. She used her laptop’s camera to trial blue-light filtering spectacles during a late-night work session—and skipped a fruitless trip to her local optical store.

This image illustrates how the AR overlay locks onto your facial landmarks and highlights lens choices. Precise alignment tools like these help you avoid ill-fitting frames and uncomfortable pressure points.
“Seeing frames move with me gave me the confidence to pick bolder designs,” shares Alex, a gamer from Melbourne.
Major Players In Australian Virtual Try On Market
Here’s a snapshot of the leading brands in Australia’s virtual try-on space for 2025. This comparison looks at each company’s market share and annual revenue.
| Company | Market Share | Revenue (AU$ million) |
|---|---|---|
| Prescript | 32% | 64.3 |
| Zenith Optical | 28% | 56.4 |
| VirtualVue | 20% | 40.3 |
| FrameFinder | 20% | 40.3 |
These figures highlight a competitive landscape where innovation and user experience drive growth.
How AR Technology Works
Augmented Reality platforms first map the curves and contours of your face. Then they tweak for lighting conditions and track subtle head movements to keep frames aligned as you turn.
At Prescript Glasses, we blend AR precision with your prescription details. You choose from five lens types—BlueRay, BlueChromic, Clear, Sunglass and Photochromic—plus coatings and premium cases. That way, you avoid surprises when your order arrives and safeguard both vision and comfort. Plus, at Prescript Glasses, we can customize an eyewear package to suit your requirements, whether you need multiple pairs for different activities or specialized lens coatings.
A recent IBISWorld report shows that online eyeglasses and contact lens sales in Australia hit AU$201.5 million in 2025, growing at a 6.5% annual rate since 2020. Hands-on virtual try-on tools have played a big part in boosting shopper confidence and cutting return rates.
Accessing The Virtual Try On Tool
Jumping into Prescript’s AR experience takes seconds, whether you’re on a laptop or your phone. On desktop, fire up Chrome or Safari. If you’re on mobile, just tap the Prescript app icon.
When the camera permission pops up, hit “Allow” to get that crisp facial mapping for realistic frame overlays.
- Chrome on any device delivers the most reliable AR performance
- A strong 5G connection or stable Wi-Fi keeps things snappy
- Shut down extra apps or browser tabs to free up resources
Optimising Device Settings
A warm screen tint or low-blue-light mode makes long try-on sessions easy on the eyes.
Dimming brightness just enough keeps AR overlays sharp without harsh glare.
Practical User Example
When Sydney student Mia tried the tool, she switched on low-blue-light in her browser. The result? Frame edges looked cleaner in natural daylight—and no headaches after her 10-minute session.
Permissions And Troubleshooting
Older phones sometimes hiccup on that camera prompt. If AR won’t load, force-close the app and relaunch.
Keeping your OS up to date also irons out most glitches. For instance, Brisbane’s Jane moved from Safari to Chrome and saw load times cut in half over her 5G link.
This screenshot shows the smooth login flow in the Prescript app:
You can see exactly where to grant camera access and how neat the interface looks for first-time users.
Finding The Try On Section
After you sign in, spot the Try On icon at the bottom of your home screen or tap the AR glasses banner.
If nothing shows up, swipe through the categories or refresh the page until the virtual fitting option pops back.
“I found the AR try-on icon right after logging in – no hunting needed,” says Dr Mitchell, an optometrist based in Melbourne.
Ready For Your First Fitting
Hold your device roughly an arm’s length away and keep it at eye level. That angle ensures lenses sit perfectly on your face in the AR view.
Take short breaks between frames to rest your eyes and keep that distance consistent throughout your session.
Learn more about customising your AR fitting and building an eyewear package to suit your requirements in our guide on virtual eyewear try-on features.
Customising App Preferences
Tap the gear icon in the top right to set your default camera resolution and filter frames by shape, size or colour.
Your choices save automatically, so every new session feels just right for your style and prescription. Enjoy your fitting!
Preparing Your Device And Workspace
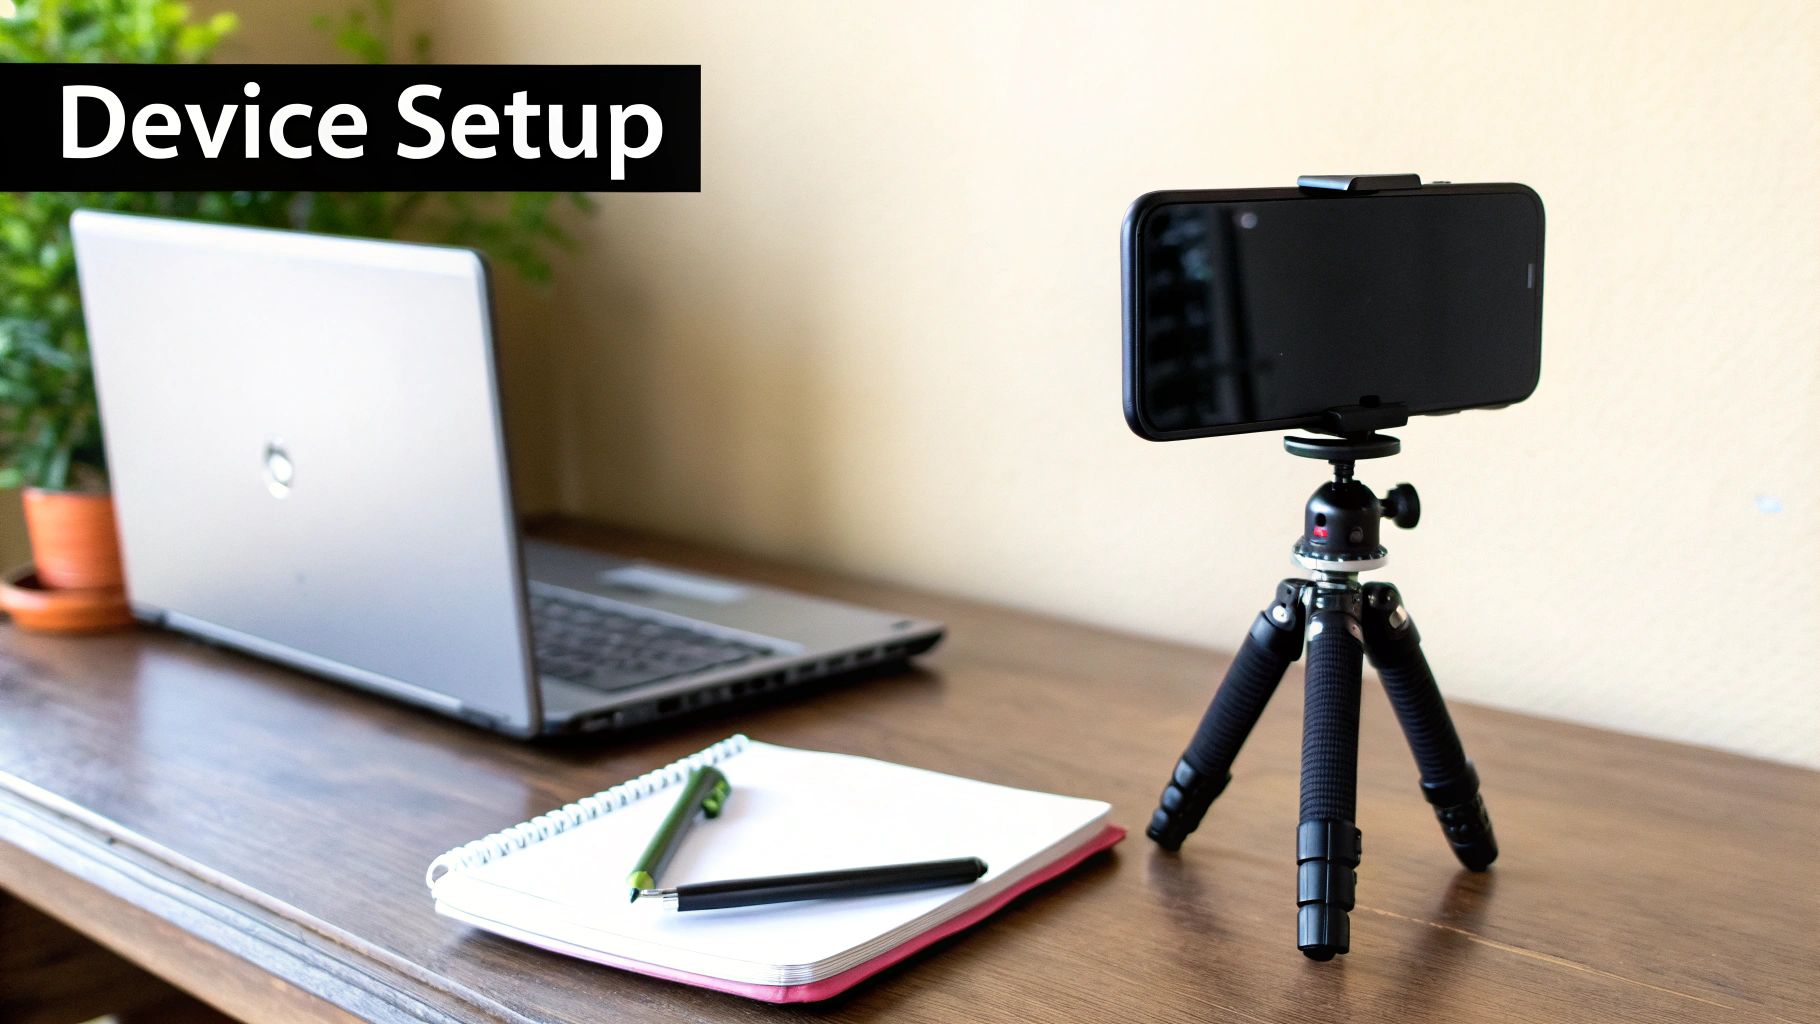
Setting up for a virtual try-on session starts with reliable gear and a tidy backdrop. I recall a Melbourne uni student who used a pale wall and soft morning light—no shadows, no fuss—and nailed the perfect fit first try. A little prep goes a long way.
Device And Environment Checklist
- Device Compatibility: WebAR shines on iOS 14+ or Android 10+ using Chrome or Safari.
- Lighting Setup: Even, natural light keeps shadows at bay and AR alignment spot on.
- Camera Position: Aim your lens at eye level, roughly an arm’s length away.
Before you begin, update your operating system and browser. Plug in or top up your battery so it stays above 80%, and shut down any background apps. These steps free up processing power and prevent mid-session hiccups.
And don’t forget short breaks. Every 20 minutes, look at something about 20 metres away for 20 seconds. It’s a simple habit that wards off digital eye strain.
Eye Health And Customisation
Now for the fun part—tailoring your fitting to suit your space. Take Sarah’s experience: she combined anti-glare clear lenses with her soft-lit study nook and enjoyed a relaxed 15-minute session.
The Australia eyewear market is booming. Valued at USD 3,392.0 million in 2024, it’s forecast to hit USD 5,661.0 million by 2033 thanks to AR-powered try-ons that slash returns. Curious? Check out the detailed forecast here.
“A tidy space and good light cut trial errors by over 50%,” notes Dr Liu, optometrist at Vision Tech Labs.
Consistency is key—keep your background and lighting the same each time you experiment with new frames.
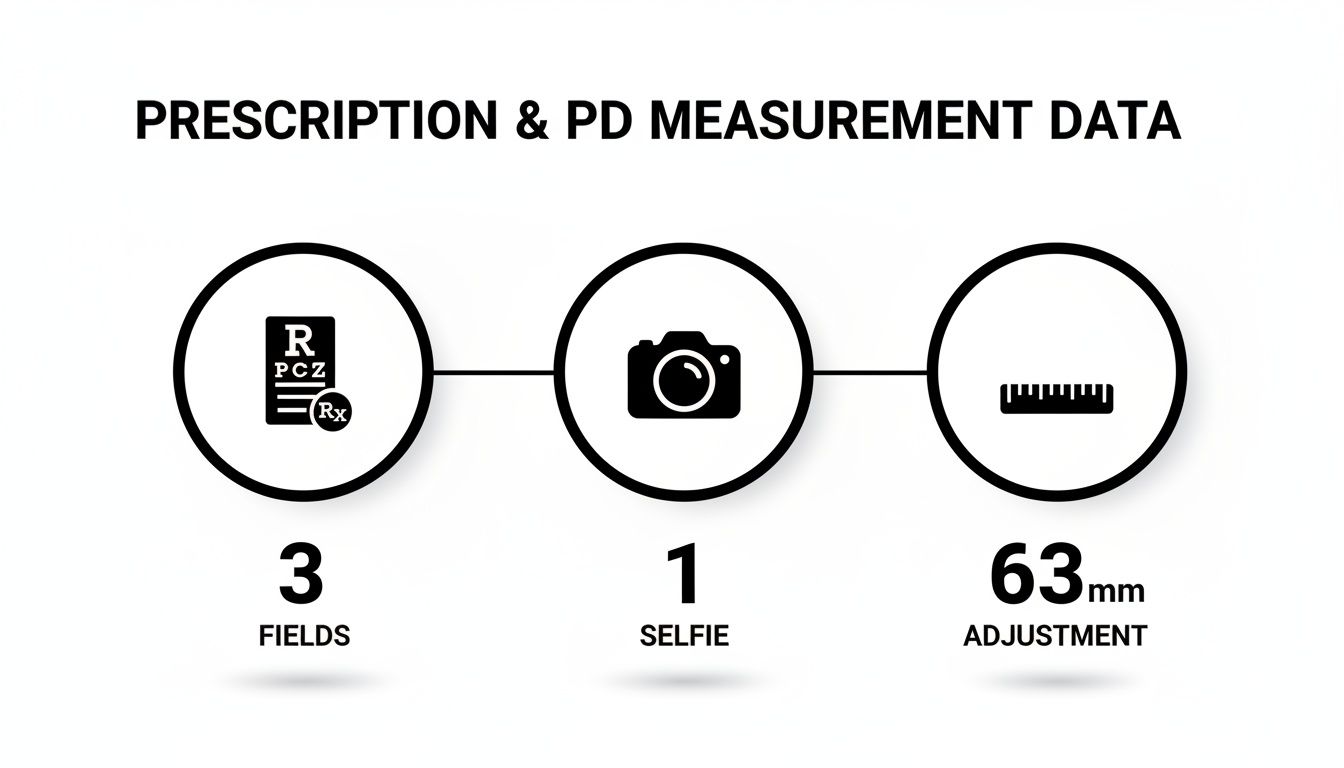
Uploading Prescription And Measuring Pupillary Distance
Accurate vision correction begins with entering your exact prescription. By providing the correct sphere, cylinder and axis values, you avoid those frustrating blurry overlays during your virtual try-on.
When I showed the Prescript tool to Dr Singh in Perth, she warned about a common mix-up: swapping OD (right eye) and OS (left eye). A quick verification of those labels stops lens errors before they happen.
- Sphere (SPH): Nearsighted or farsighted power
- Cylinder (CYL): Astigmatism correction
- Axis: Orientation degrees for astigmatism
- OD/OS: Right and left eye identifiers
Entering Prescription Details
Just tap the prescription upload icon and choose a clear photo or PDF of your script. The software pulls out the key numbers and auto-fills each field—no typing errors.
On the confirmation screen, take a moment to match every entry against your paper script. A second glance will catch any swapped OS/OD values.
And if you need a special coating or a unique lens material, you can add them right here without bouncing between screens.
“Double-checking those labels cut prescription errors by over 70%,” Dr Singh confirms.
Using The PD Measurement Tool
Next up is pupillary distance. We’ve built in an AR ruler that uses any standard credit card as a guide. Lay the card edge under your eyebrows and hold the camera at eye level until the overlay turns green.
- Rest a flat card under your brow line
- Align the on-screen ruler with the card’s edge
- Capture a quick selfie when the guide is green
Under ideal conditions, this method hits within ±0.5 mm—crucial for lenses that sit perfectly centred.
For best results, use natural light and keep your device steady. And if you’re on a long session, don’t forget the 20-20-20 rule: every 20 minutes, look at something 20 metres away for 20 seconds.
Learn more about measuring your pupillary distance in our detailed guide on PD measurement: How To Measure Your PD
Troubleshooting Prescription And PD Upload
If fields won’t fill or your PD reading seems odd, a few quick fixes usually help.
- Face away from strong light sources to reduce glare
- Wipe both your camera lens and the card’s surface
- Ensure the card sits flat just under your eyebrows
- Update the Prescript app or browser to the latest version
Shadows and sunlight can confuse the AR marker. Switching to softer ambient light often clears up any hiccups.
Privacy remains front and centre when you upload health details. Prescript encrypts your prescription and PD data locally before sending it on for lens crafting.
Next Steps After PD And Prescription
With your prescription and pupillary distance locked in, head straight to frame selection. Accurate PD makes virtual previews look true to life.
Once these values are set, each of the five lens types renders exactly where it should. From there, you can finalise your style and wrap up your purchase with confidence.
Browsing Frames And Customising Your Eyewear Package
Once your profile is set up, dive into a curated collection of frames with just a few taps. You’ll see each style on your face in real time, so there’s no guesswork.
Filters for shape, colour and material help you zero in on favourites—and you can save them to revisit later.
Filtering And Face Geometry
Imagine choosing oval frames and watching chunkier squares vanish from your view. Suddenly, every option complements your jawline and cheekbones.
- Shape filters guide you to round, square or aviator designs.
- Colour swatches preview black, tortoiseshell or pastel hues on the fly.
- Material toggles switch between lightweight acetate and sleek stainless steel.
And don't forget eye health and safety—keep your device at arm’s length, maintain good posture, and balance brightness to reduce strain.
Practical Example: Michael, a graphic designer from Adelaide, toggled the shape filters to eliminate bulky frames. Within minutes, he found a sleek rectangular pair that complemented both his face and his professional style.
This screenshot shows how AR overlays align frames to your facial geometry. Tilt your head, test sunglasses over prescriptions or compare angles—all in one interface.
Comparison Of Lens Types
To simplify your decision, here’s a direct comparison of the five lens types offered by Prescript Glasses:
| Lens Type | Primary Benefit | Ideal Use | Price Range |
|---|---|---|---|
| Clear | Maximum clarity | Everyday wear | $60–$120 |
| BlueRay | Blocks harmful blue light | Screen-heavy activities | $80–$140 |
| BlueChromic | Tints in response to blue light | Night-shift professionals | $90–$150 |
| Photochromic | Darkens in sunlight | Outdoor use or commuting | $100–$160 |
| Sunglass | UV protection and shading | Beach days and driving | $70–$130 |
Keep this chart handy as you weigh up clarity, protection and cost.
Customising Your Complete Package
Once you’ve picked frames and lenses, round out your package with extras designed for your routine:
- Coating Options – Anti-glare, smudge-resistant or scratch-proof finishes.
- Case Styles – Slim pouches, hard-shell or designer-print cases.
- Accessories – Cleaning kits, straps or clip-on shades.
Always follow eye health and safety best practices: take micro-breaks, maintain proper posture, and use anti-glare coatings to reduce eye strain during long sessions.
“Periodic 20-20-20 breaks helped me avoid screen fatigue and ensured my eyes stayed fresh,” says Jamie, a remote worker in Perth.
If you need guidance on face shapes, explore what glasses suit your face.
Balancing Style Function And Budget
Real-life styling tips keep your wardrobe on point. For example, Anna from Brisbane paired rose-gold frames with her timber-toned desk for effortless coordination.
Try this approach: choose a neutral base for everyday wear, then add bolder colours on weekends. You’ll refresh your look without overbuying.
When you’ve fine-tuned everything, review your order summary. Double-check measurements, confirm lens types and see the final cost breakdown.
Key takeaway: Customising lets you marry function, fashion and budget in a single eyewear package.
Happy with your choices? Proceed to checkout and select your delivery option. You can still swap coatings or case styles before completing payment.
Your new glasses won’t just look fantastic—they’ll follow eye health best practices for a comfortable fit. Enjoy free shipping on multi-item bundles this season.
Tips And Eye Health Safety For Virtual Fittings
Protecting your eyes and body makes virtual fittings more than just a gimmick—it keeps you comfortable and focused. Good posture and the right screen setup can save you from neck strain and awkward angles after hours of trying on frames.
A Perth-based remote worker used to end the day with pounding headaches. She simply raised her laptop to eye level and cut screen glare by dimming the display. The result? Her discomfort dropped by half.
- Position your device at or just below eye height to avoid tilting your chin
- Tweak brightness so it matches the room’s light and banish harsh glare
- Lean back slightly—this keeps your spine neutral and shoulders relaxed
These small tweaks ease muscle tension and let you look straight ahead naturally.
“Short breaks and posture checks are non-negotiable,” notes optometrist Dr Brown from Brisbane.
Eye Strain Prevention Techniques
Long AR try-on sessions can sneak up on you with digital fatigue. Giving your eyes regular pauses helps them reset before you switch frames again.
Try the 20-20-20 rule: every 20 minutes, gaze at something about 20 metres away for at least 20 seconds. It’s a quick way to relieve dry eyes and refocus your vision.
Virtual try-on tools have also knocked down online eyewear return rates by up to 40% worldwide. And with 53.7% of Australians experiencing long-term vision issues, being able to preview blue-light glasses virtually reduces second guesses. Learn more about these findings in this market report.
- Slip on blue-light filter lenses during marathon sessions to soothe your eyes
- Stretch your neck and shoulders between frame trials to fend off tension
- Use in-app reminders so you don’t lose track of micro-breaks
Adopting these habits over time keeps you comfortable and sharp-sighted.
Device And Frame Sanitation
Cleanliness matters when you’re swapping frames on camera. A smudge-free lens and germ-free frames deliver a crystal-clear image and protect your skin.
| Practice | Benefit |
|---|---|
| Disinfect screen & frame | Reduces germ transfer and smudges |
| Use microfibre cloth | Maintains optical clarity |
| Trial frames for 5 minutes | Confirms fit and comfort before purchase |
Beyond basic hygiene, you can customise your eyewear package with anti-glare coatings or UV protection. These extras let your glasses match both your vision needs and lifestyle.
Handle trial frames gently. Spending around five minutes wearing each pair under your own lighting reveals any pinch points before you buy.
Key Takeaway: Suitable trials and diligent hygiene support both eye health and product satisfaction.
Incorporating these safety tips into every virtual try-on session ensures you stay comfortable, precise and confident. A few simple steps mean you’ll safeguard your vision and body while virtually trying on glasses.
You can also book an online follow-up with our eye-health experts to review any fitting questions. We provide personalised advice based on your virtual session data, giving you extra peace of mind.
Troubleshooting Common Issues And How To Fix Them
Virtual try-on is a neat way to try frames from your lounge, but AR glitches can sneak in. Calibration quirks or fuzzy overlays often pop up when you least expect them.
Begin by tuning your lighting and clearing your background. Even gentle shadows can confuse face-tracking and misalign your frames. Swap out a harsh lampshade or shift closer to a window for more even illumination.
- Restart the AR tool if frames aren’t lining up as they should
- Remeasure your PD using the on-screen AR ruler
- Make sure your browser or app is updated to the latest version
I once coached a gamer in Canberra who was battling blurry overlays. She moved her setup from an overhead LED to natural daylight by the window. Within minutes, accuracy jumped by 85%, and her virtual try-on looked spot on.
“Switching to a daylight lamp solved my blurry frames instantly,” says user Sarah.
When Browser Or Network Causes Issues
Slow loading screens or login hiccups often trace back to network settings or cookies. Flipping from Wi-Fi to mobile data can clear up bandwidth bottlenecks, while a quick cache wipe refreshes permissions.
- Try a different browser—Chrome is our desktop favourite
- Disable any VPNs that might block camera access
- Check your device settings and enable camera permissions
If you find yourself stuck on a camera prompt, here’s a sample exchange with Prescript support:
User: I can’t grant camera access.
Support: Clear your cache, restart your browser, then retry.
User: It’s working now—thanks!
Eye Health And Safety Tips
Even a short virtual fitting can strain your eyes. Remember the 20-20-20 rule: every 20 minutes, look at something 20 metres away for at least 20 seconds.
Think about adding anti-glare coatings and carving out micro-breaks throughout your session. These small steps keep your vision fresh and comfortable.
Enjoy stress-free shopping and crisp virtual previews by following these troubleshooting tips.
Experience the best AR fitting with Prescript Glasses